This page describes how to customize myPhysicsLab simulations using only a browser and text editor.
Contents of this page:
Additional information:
Clicking the “share” button is the easiest way to customize a simulation.
Modify the simulation by changing parameters such as gravity, damping, and by dragging objects with your mouse.
Click the “share” button. Copy the URL from the dialog.
Paste the URL in an email. Or save it in a text file for later use.
When the recipient clicks the URL, the EasyScript that is embedded in the URL will replicate the conditions that you set up.
If you click the “share” button while the simulation is paused, the resulting
URL will contain RUNNING=false. You should change that to RUNNING=true if you
want the simulation to start immediately when the recipient clicks on the link.
To get more exact control over the initial conditions (position and velocity) see the section below about Customizing with EasyScript.
EasyScript allows setting any Parameter or Variable of an application.
EasyScript is a simple scripting language with just one command: assignment. Here is an example of an EasyScript that you can use in PendulumApp
ANGLE=-2.5; ANGLE_VELOCITY=-4; GRAVITY=5; DAMPING=0.1;
Click the “Terminal” checkbox which opens a command line interface where you can enter the above EasyScript. See the section below Terminal for Script Execution for more about Terminal.
To find other possible parameter names, type values into Terminal which shows all the
names that can be set and their current values:
> values
APP.SHOW_ENERGY=false;
APP.SHOW_CLOCK=false;
APP.PAN_ZOOM=false;
SIM.LENGTH=1;
SIM.DAMPING=0.1;
SIM.MASS=1;
SIM.DRIVE_AMPLITUDE=0;
SIM.DRIVE_FREQUENCY=0.6666666666666666;
SIM.GRAVITY=5;
DIFF_EQ_SUBJECT.DIFF_EQ_SOLVER=RUNGE_KUTTA;
SIM_RUNNER.TIME_STEP=0.025;
SIM_RUNNER.DISPLAY_PERIOD=0.025;
SIM_RUNNER.RUNNING=true;
CLOCK.TIME_RATE=1;
STATUS_VIEW.WIDTH=20;
STATUS_VIEW.HEIGHT=20;
STATUS_VIEW.CENTER_X=0;
...
SIM_VIEW.WIDTH=4;
SIM_VIEW.HEIGHT=3.7;
SIM_VIEW.CENTER_X=0;
SIM_VIEW.CENTER_Y=-0.3500000000000001;
SIM_VIEW.SCALE_X_Y_TOGETHER=true;
SIM_VIEW.VERTICAL_ALIGN=MIDDLE;
SIM_VIEW.HORIZONTAL_ALIGN=MIDDLE;
SIM_VIEW.ASPECT_RATIO=1;
SIM_VARS.ANGLE=0.0000020353495509370503;
SIM_VARS.ANGLE_VELOCITY=-4.825144476856234e-7;
SIM_VARS.TIME=307.1499999999945;
SIM_VARS.ANGLE_ACCELERATION=-0.000010128496309909662;
SIM_VARS.KINETIC_ENERGY=1.164100961126811e-13;
SIM_VARS.POTENTIAL_ENERGY=-3.999999999989643;
SIM_VARS.TOTAL_ENERGY=-3.9999999999895266;
Consider the first value shown:
APP.SHOW_ENERGY=false;
The first part of the identifier, APP, is the name of the Subject. This is the
name of the application that sets up the simulation, user interface and display.
The second part of the identifier, SHOW_ENERGY, is the name of the Parameter.
That Parameter controls whether the energy bar graph is shown. The “show energy”
checkbox also modifies this Parameter.
The Subject name is optional when the Parameter name is unique among all the
Subjects. This is why we can say simply ANGLE=-2.5 instead of SIM_VARS.ANGLE=-2.5.
Some Parameter names are not unique, such as WIDTH, so the Subject name must be
specified in that case.
Here are some ways to use EasyScript:
Click the Share Button which displays a URL query script that replicates the current simulation state. You can then copy the URL to the clipboard and paste it in an email.
In Terminal you can enter EasyScript at the command line, see the example above.
In Terminal the script command prints the simplest EasyScript that replicates the
current simulation state. This script can be copied and used later.
> script
DAMPING=0.1;GRAVITY=5;RUNNING=false;ANGLE=-2.5;ANGLE_VELOCITY=-4;
When the simulation is paused you will see RUNNING=false. Change the value
to RUNNING=true to have the simulation start playing when the EasyScript
is executed.
In Terminal the url command prints the same URL query script that you get from
using the “share” button. It is a combination of the URL for the current page, a
question mark, and the result of the script command. The query part of the URL
is the part following the question mark.
The URL can be saved in a text file or sent to someone else to view the customized simulation. Here is an example:
> url
https://www.myphysicslab.com/pendulum/pendulum-en.html?DAMPING=0.1;GRAVITY=5;
RUNNING=true;ANGLE=-2.5;ANGLE_VELOCITY=-4;
EasyScript can be mixed with JavaScript, see Customizing with JavaScript below.
See Customizing the Start-Up HTML Page below for more ways to use EasyScript.
See EasyScriptParser documentation for more details.
Using JavaScript to customize a simulation allows access to the full set of classes and methods of myPhysicsLab, as well as anything that can be done with JavaScript.
JavaScript can be put in <script> tags on an HTML page. See the section below about
Customizing the Start-Up HTML Page. In this case the JavaScript is directly
evaluated by the browser when the page is loaded.
Everywhere else (other than on the start-up HTML page), JavaScript is evaluated by the Terminal class which does some transformations and imposes some restrictions:
Terminal enables usage of some “short names” which are expanded to the actual
JavaScript identifiers. For example, you can write PointMass instead of
lab$model$PointMass which is the global identifier for that class.
Terminal evaluates both EasyScript and JavaScript. They can be mixed together
and the result variable can be used after evaluating EasyScript to access
the value of a Parameter in JavaScript.
The documentation about Terminal has details about these transformations.
The section Terminal Utilities below has some helpful commands. For example, the
vars command shows the names of available variables.
Here are places to put scripts which will be evaluated by Terminal:
Paste into Terminal: Copy the script and paste into Terminal’s input area to execute.
URL Query: This combines the URL of the simulation with a script to execute after the page loads. See URL Query Script in the Terminal documentation.
Use app.eval(): On the start-up HTML page, in a <script> tag, you can call
the application’s eval method which executes the script via Terminal.
See Miscellaneous Script Locations for ways to execute a script at a future time.
Here is an example of JavaScript commands which can be pasted into the Terminal input area of DoublePendulumApp.
simRun.reset();
var va=sim.getVarsList();
va.setValue(0, 0.15545);
va.setValue(1, -0.33548);
va.setValue(2, -2.30681);
va.setValue(3, 2.68179);
sim.saveInitialState();
sim.setGravity(5.0);
statusView.getDisplayList().add(energyGraph);
statusView.getDisplayList().add(displayClock);
simRun.resume();
Those commands will restart the simulation from the specified initial conditions, set gravity to a certain value and show the EnergyBarGraph and DisplayClock. The DoublePendulumApp documentation has more information about that specific simulation.
It is possible to customize a simulation by adding scripts to the start-up HTML page.
You will need to install the modified HTML file somewhere (such as your local machine or a web server), as well as any other files that are needed such as
PendulumApp-en.jsrewind.pngstylesheet.cssIn the application’s Start-Up HTML file you can execute
EasyScript via the application’s eval method. Here is an example from the file
PendulumApp.html which runs
PendulumApp
<script>
app.eval('DRIVE_AMPLITUDE=0; DAMPING=0.1; GRAVITY=9.8; ANGLE=2.5; ANGLE_VELOCITY=0;');
</script>
Here is an example of JavaScript that can be added to SingleSpringApp.html
to customize SingleSpringApp. The
commands are executed in Terminal via app.eval.
<script>
app.eval('sim.setSpringStiffness(20);'
    +'sim.setDamping(0.01);'
    +'sim.getVarsList().setValues([-1, -5]);');
</script>
Here is an example which uses regular JavaScript directly (not executed via Terminal):
<script>
(function() {
  var sim = app.sim;
  sim.setSpringStiffness(20);
  sim.setDamping(0.01);
  sim.getVarsList().setValues([-1, -5]);
})();
</script>
The reason the script is enclosed in a self-executing function is so that the local variables stay local and do not become global variables.
The compiled JavaScript application determines what classes are available for scripting. Usually the compiled JavaScript file contains code for only a single simulation and application (the application instantiates the various pieces such as the simulation, the display and user interface). But it is possible to include several simulation and application classes in a compiled JavaScript file.
An example of multiple simulations in one JavaScript file is
TerminalSpringApp which includes
most of the spring simulations (those in the namespace myphysicslab.sims.springs).
Each HTML file can have a script which instantiates and runs any of those
simulations. The following HTML files both use TerminalSpringApp.js but show
different simulations:
TerminalSpringApp.html runs SingleSpringSim, you can try the
online version.
TerminalSpring2DApp.html runs Spring2DSim, you can try the
online version.
The Terminal class provides a command line interface that allows executing script commands, both EasyScript and JavaScript, and displays the results of those commands. See the above section Customizing with JavaScript for more about using JavaScript. See the Terminal documentation for more details.
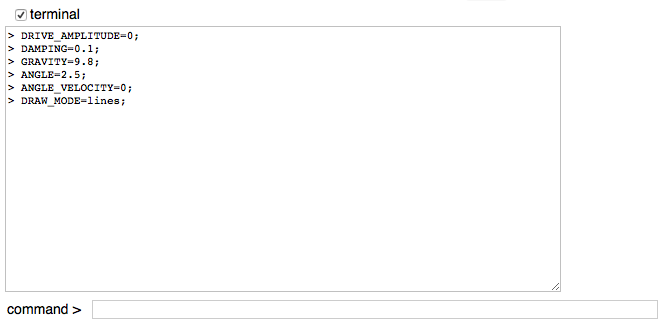
In most myPhysicsLab applications the Terminal input and output text areas can be made visible by clicking the “Terminal” checkbox, as seen in this screenshot:
The Terminal class provides an input text area for the user to enter JavaScript or EasyScript scripts, and an output text area showing the results of the scripts that are entered. In the output text area, commands are preceded by '> '.
When you type a command into Terminal, it is executed and the result is displayed in the Terminal output text area. If the command ends with a semicolon then the printing of the result is suppressed. Multiple commands separated by semicolons or new lines can be given in one line.
Some useful utilities available in Terminal:
help shows useful commands, and the compilation date.
vars shows the names of available variables. For example there are usually
variables named app for the application and sim for the simulation.
You can see the contents of most objects by typing the name which results in
the object’s toString() method being called.
prettyPrint(app) inserts carriage returns and indentation to make the toString()
result more readable. Synonym for
Util.prettyPrint.
prettyPrint(app, 5) does prettyPrinting with indentation level of 5 instead of
the default indentation level of 3.
methodsOf(app) shows the available methods that can be called on the object.
Synonym for
Util.methodsOf.
propertiesOf(app) shows the names of properties of an object. Synonym for
Util.propertiesOf.
Useful especially to see the what is defined on app which is the usual name for
the application that creates the simulation.
propertiesOf(app, true) shows the properties and values of object app
To make using JavaScript in Terminal more user-friendly – with less typing, less remembering long path names – we define a set of “short names” for important objects. For example, in many applications we can type just
sim instead of app.simsimCanvas instead of app.layout.simCanvasPointMass instead of lab$model$PointMassThese short-names are implemented by defining a set of regular expression replacements which are applied to the Terminal input string.
The vars command in Terminal shows the set of available variables, most of which are
short-names.
The regular expressions for short-names are defined in two places:
Terminal.stdRegex defines a
standard set of short-name regular expressions; mostly class names, but also useful
functions like prettyPrint, methodsOf, println and propertiesOf.
Each application usually has a method called defineNames which defines short-name
regular expressions unique to that application. See for example
[DoublePendulumApp.defineNames]
(./classes/sims_pendulum_DoublePendulumApp.DoublePendulumApp.html#defineNames).
For more information, see
Short Names in the
Terminal class documentation. See the section about
Global Variables to learn
about what global variables are available, such as app and myphysicslab.
Scripts can be set up to execute at a future time.
GenericMemo is a Memorizable which can be installed so that it is executed after each simulation time step.
The documentation of GenericMemo shows an example that prints the value of a simulation
variable into the Terminal output area. Here simRun is an instance of
SimRunner.
var angle = sim.getVarsList().getVariable('ANGLE');
var memo = new GenericMemo(()=> println('angle: '+angle.getValue()));
simRun.addMemo(memo);
That code can be entered as Terminal commands in PendulumApp.
FunctionVariable is a Variable whose value is defined by a JavaScript function.
An example of using FunctionVariable is in
SingleSpringApp.
This adds a variable whose value is sin(time):
var va = sim.getVarsList();
var fnv = new FunctionVariable(va, 'sin_time', 'sin(time)', () => Math.sin(sim.getTime()))
va.addVariable(fnv);
The variable can then be displayed in a graph.
ClockTask holds a callback function to be executed at a specified time; it is used with a Clock. The documentation of ClockTask shows an example that pauses the Clock after 5 seconds:
var task = new ClockTask(5, () => clock.pause());
clock.addTask(task);
A GenericObserver observes a Subject; when the Subject broadcasts a SubjectEvent then this executes a specified function. See the section about Subject-Observer in the Architecture overview.
Here is an example of a GenericObserver that prints any event broadcast by a Clock. This code can be entered in Terminal
var obs = new GenericObserver(clock, evt => println('event='+evt));
The next example prints only when a particular event occurs:
var obs = new GenericObserver(clock, evt => {
    if (evt.nameEquals(Clock.CLOCK_PAUSE)) println('event='+evt)});